Affiliate disclosure: I am an affiliate of WebinarFuel. If you buy through my WebinarFuel links I earn a commission (30% recurring) at no extra cost to you. Nothing here is a promise of income or results.
What you'll have at the end
An automated (recorded) webinar running on a schedule, with a registration page, reminders, your offer button in the room, and sales tracking.
Affiliate link: we may earn a commission at no extra cost to you. Disclosure
Before you start: the four things you need
Per WebinarFuel's onboarding doc:
- A landing (registration) page. WebinarFuel has basic prebuilt landing pages, or you can paste its registration widget into your own page builder (any builder works).
- Video hosting for your webinar recording. Plans include some hosted videos (Pro lists 2, FuelSuite Pro lists 5, per the pricing page Oct 20) with a 1 TB bandwidth limit. Wistia, Vimeo and SproutVideo appear on the Integrations screen, but see the video note in Step 1: when we tested (Oct 27, 2026), the webinar's "Integrated Video" option only accepted a Vimeo Pro link.
- An order page for your offer, which the in-room button sends people to.
- A thank-you page after purchase. Optional, but it's where the sales-tracking code goes, so set one up.
Free download: Get the Evergreen Webinar Checklist (we'll email you the PDF). You can also read it on the checklist page.
Step 1: Create the webinar and add your video
Click the + to create a new webinar, name it, and set the time zone your audience will see dates in. After you click Create, a short wizard walks you through Webinar Info > Videos > Sessions > Finish.
- Verified Oct 26-27, 2026: "Create Webinar" opens a dialog with Title, Description, Tags ("Type your tag(s) and hit enter"), Time Zone (default UTC; the first option is "Registrants Time Zone", then about 130 zones), Language (default En; also Ru, Fr, De, Ja, Es, Pl, Pt, Nl, Da, Th, Zh-CN, Cs, Nb) and Time Format (12h/24h). "Create" stays disabled until there's a title.
- Videos step: choose Upload Video (Name + File;, then the video shows as processing in) or Integrated Video (Name, Integration, Video Link, optional Video HLS Link;). The only Integration offered was "Vimeo Direct Link".
- Sessions step: session types are On (a date and time), Every (Day / Week / Two Weeks / Month at a time), Now, Replay and Tomorrow. Use "Add New Session" for more than one.
- Finish step: optional registration page link and thank-you page link. You can leave both blank and add them later (Step 5).
- Success page links to WebinarFuel's Onboarding Guide, Widgets, Tracking, Notification and Integration docs. Then you land on the webinar's dashboard with the setup menu: Main, Videos, Schedule, Registration Widgets, Registration & Thank You URL, Webinar Room, Integrations, Notifications, Automations.
- Main: name, label, tags, description, time zone, locale, hour format, country code (default United States +1) and hosts ("Add New Host").
Tutorial note: integrated video only accepts Vimeo Pro links. In our Oct 27, 2026 test, pasting a YouTube link or a plain .mp4 URL into Integrated Video was rejected with a message asking for a valid Vimeo Pro URL. So either upload the video file with Upload Video, or host it on Vimeo Pro and paste that link. YouTube won't work.
Step 2: Set the schedule
Open SCHEDULE in the webinar's navigation.
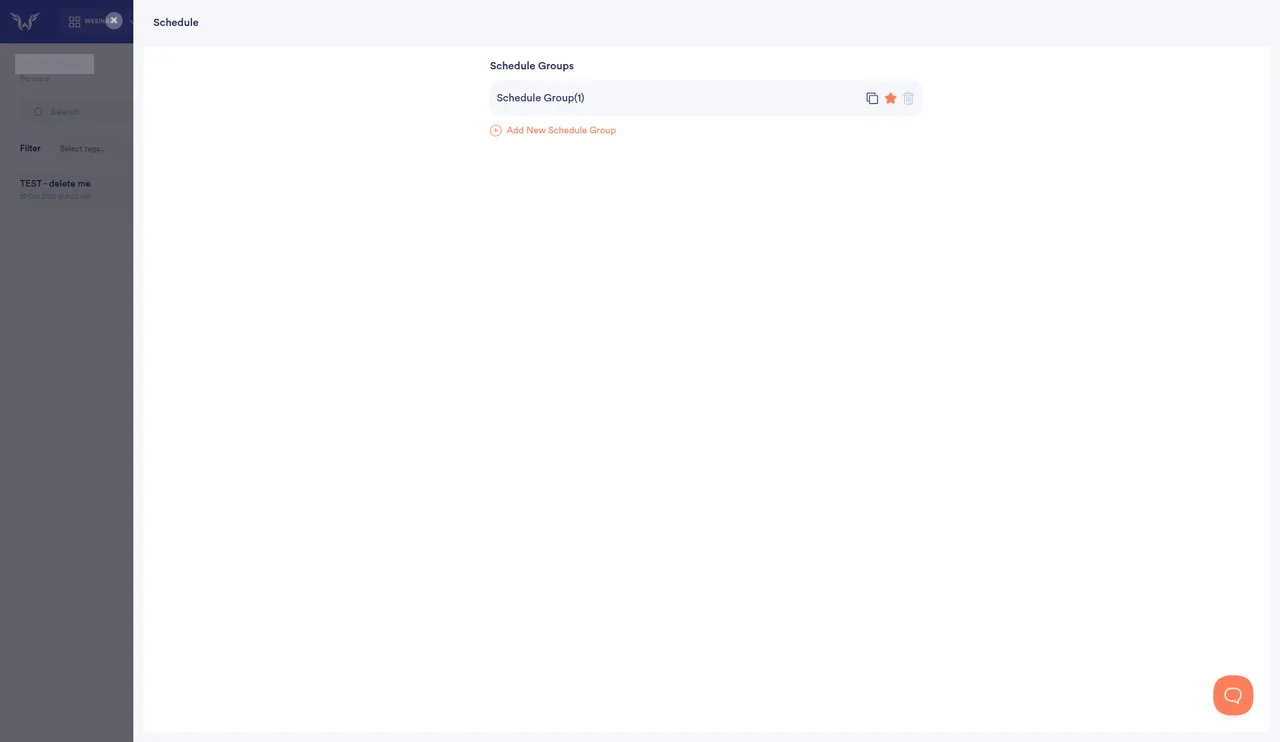
- Verified Oct 27, 2026: Schedule works in Schedule Groups: copy, set as default (star) or delete a group, or "Add New Schedule Group".
- Inside a group: group name; sessions (the same five types as the wizard: On, Every, Now, Replay, Tomorrow); Session Display (how many upcoming sessions to show; default 5, range 1-20); Encore (off by default); Black Out Dates ("Add Date"); Night Schedule (ON by default, 11 PM to 7 AM; check this setting before you publish); Block Short Term Registration (off); Late Registration Window (off).
- Tip to write after testing: which schedule we'd pick for a coach and why.
Step 3: Set up the registration and thank-you widgets
Open REGISTRATION WIDGETS. This sets up both the registration widget and the thank-you page widget.
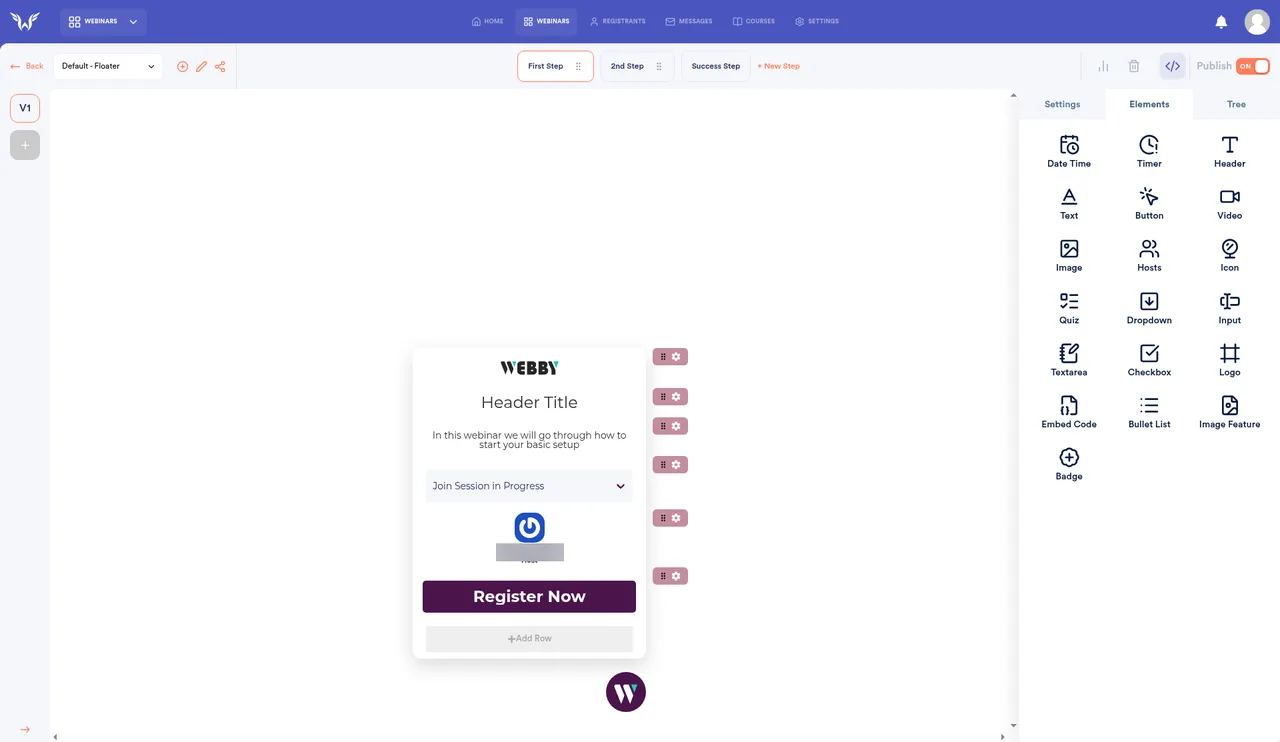
- Verified Oct 27, 2026: a visual builder with a Publish toggle (it showed ON by default on our new webinar). Templates: Default - Floater, Default - Modal, Default - Embed, Vertical - Thank you, Horizontal - Thank you.
- Steps across the top: First Step, 2nd Step, Success Step, "+ New Step". A version selector on the left (V1 and +) lets you make A/B-style versions.
- Elements you can drag in: Date Time, Timer, Header, Text, Button, Video, Image, Hosts, Icon, Quiz, Dropdown, Input, Textarea, Checkbox, Logo, Embed Code, Bullet List, Image Feature, Badge.
- Verified Oct 30, 2026: the First Step has no form fields. It shows the logo, Header Title, intro text, a session dropdown ("Join Session in Progress"), a host card and a Register Now button. The 2nd Step form collects Email and Full Name, plus a consent checkbox (WebinarFuel Terms of Service/Privacy Policy), then Register Now. There's no phone field and no SMS opt-in by default; add them yourself with the Input and Checkbox elements if you want SMS reminders.
- The Publish toggle in the widget editor turns the widget on or off. It does not publish the webinar.
Step 4: Put the widget codes on your pages
Paste the registration widget on your registration page and the thank-you widget on your webinar thank-you page. These work on any web page builder.
- Show pasting the script-tag embed into any page that accepts custom HTML/JS (our review site will be Cloudflare Pages static HTML). Optionally use WebinarFuel's own prebuilt registration page as an alternative.
-
Verified Oct 30, 2026: the </> icon in the widget builder gives script tags, not an iframe: a loader script (
<script src="…/embed_v2.js" async></script>) plus a short snippet that pushes your widget ID (window._wf = window._wf || []; _wf.push({ id: '…' });). The popover also has Add source (off), Hash, ClickFunnels Timer ID (off) and Copy to Clipboard. Paste it wherever your page builder accepts custom HTML/JavaScript. Always blur the widget ID when you show it.-
-
Optional: WebinarFuel's doc links a registration-page template from Anthony Morrison's own funnel for ClickFunnels users. Mention it only if we've looked at it in the trial.
Step 5: Enter your page URLs and end-of-webinar behaviour
Input your registration and thank-you page URLs and choose what happens to attendees when the webinar ends (for example, redirect to your offer).
- Verified Oct 27, 2026 (Registration & Thank You URL panel): registration page link, thank-you page link, If session expired (default: redirect to registration page; or redirect to the replay), a redirect URL for when the session ends, and Tag Registrant (off by default). Related doc: How to set a URL redirect after the webinar ends
Step 6: Design the webinar room, replay and offer buttons (CTAs)
In WEBINAR ROOM you set the look and feel, the replay room, and the call-to-action buttons that point to your order page.
- Verified Oct 27, 2026, Live tab: an experience selector ("Regular", plus "+ New Experience"); Chat tab and Q&A tab (each Enable / Disable / Private); Files (on); Attendees (Enable / Disable / Dynamic); "Merge new messages from LIVE chat to Master chat after each session?" (on); Enable Presenters tab (on); Live Icon and Attendees Icon (Enable / Disable / Mouseover); mobile icon position (default TopRight). Those were the settings on our new test webinar.
- Replay tab: Chat and Q&A off by default, Files on, Show Controls (Always / After X visit), Show Offer (Always / Seen Offer), Closeout off.
- CTAs tab: a "Filter by Video" selector and "Add Cta", so offer buttons are set per video.
- Automations (separate menu item): "Add New Rule" plus Quick Actions: Clicked Offer Segment, Thanks You Page Sales, Webinar Full, Skip Thank You Page, Registration Devices, Playback Device, Quizzes, Customize Reg Experience, Skip to a specific start time.
- Verified Oct 30, 2026, Add Cta: choose Poll, Message, Offer or File. The Offer form has a video selector; headline and extra text; Button 1 and Button 2 (text, link, amount, product ID); a Join Offer label; a Claims Goal (a "7/10 claimed" style counter that hides the offer at the goal); an offer image (2 MB max); Offer Duration (hh:mm:ss); Session Type (Live and Replay / Live / Replay); a countdown timer (on by default); filter tags; and Time To Display (hh:mm:ss) with "+ Add Cuepoint". So you set when the offer appears and how long it stays up. There's no separate hide-at field.
- Replay window: there's no explicit replay-availability setting. You control it with the Replay tab's Closeout toggle, the "Replay" session type, or the Automations quick action "Expire Replay" (sends viewers to a closed-offer page after a set time).
- Host: there's no host-avatar setting in the room. Hosts appear through the widget's Hosts element/host card and the hosts list under Main.
- Attendees tab: the room's Attendees tab (and Settings > Attendees) says "This is a pro plan feature. Please upgrade your account." on our FuelSuite Pro trial, so we couldn't show what's inside it.
- Honesty note for Claims Goal and countdowns: only show a claims count or deadline that's real.
- Honesty box (keep this in the final page): label the session as recorded on the registration page and at the start; don't present pre-written or replayed chat as live people; only use real deadlines. See Are Automated Webinars Ethical?
- Related docs: Webinar room CTAs explained, Replay room settings
Step 7 (optional): Connect your email tool
WebinarFuel has a built-in CRM, so this is optional, but you can push registrants to your autoresponder through Integrations.
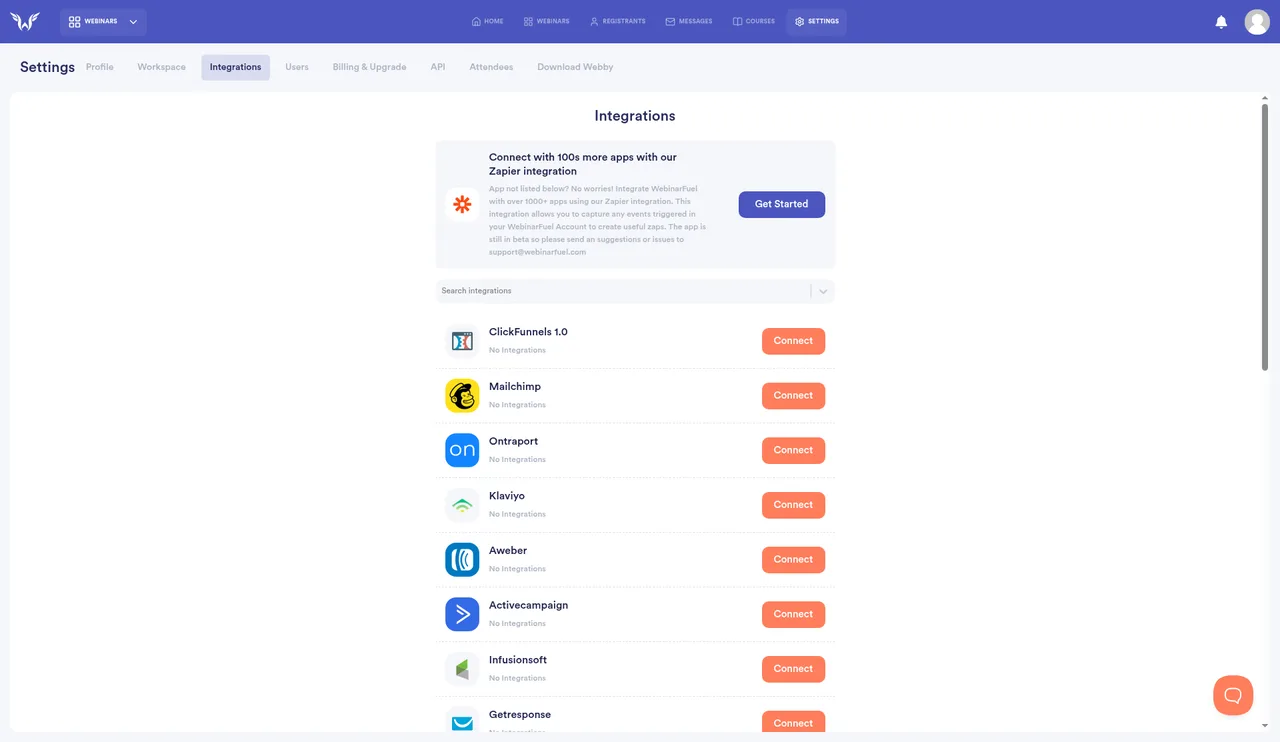
- Available integrations (Integrations screen, Oct 26, 2026): ClickFunnels 1.0, Mailchimp, Ontraport, Klaviyo, AWeber, ActiveCampaign, Infusionsoft, GetResponse, Facebook, Facebook CAPI, Slack, ConvertKit, HTML, Drip, SproutVideo, Wistia, Vimeo, Webhook, Close, Google reCAPTCHA, Cloudflare Turnstile, HighLevel and HubSpot, plus a Zapier app (labelled beta).
- Verified Oct 30, 2026: the Integrations item inside a webinar opens a side panel that stays empty until you connect apps at account level, where every app showed "No Integrations / Connect". We didn't connect a third-party account in the trial, so this step shows the list and points readers to WebinarFuel's own docs for connecting their tool, rather than a filmed connection.
Step 8: Set up reminder notifications (email and SMS)
Notifications are what get people to actually show up. They use WebinarFuel's own email/SMS credits (Pro lists 1,000 email and 50 SMS credits a month as of Oct 20), and you can buy more credits inside the platform.
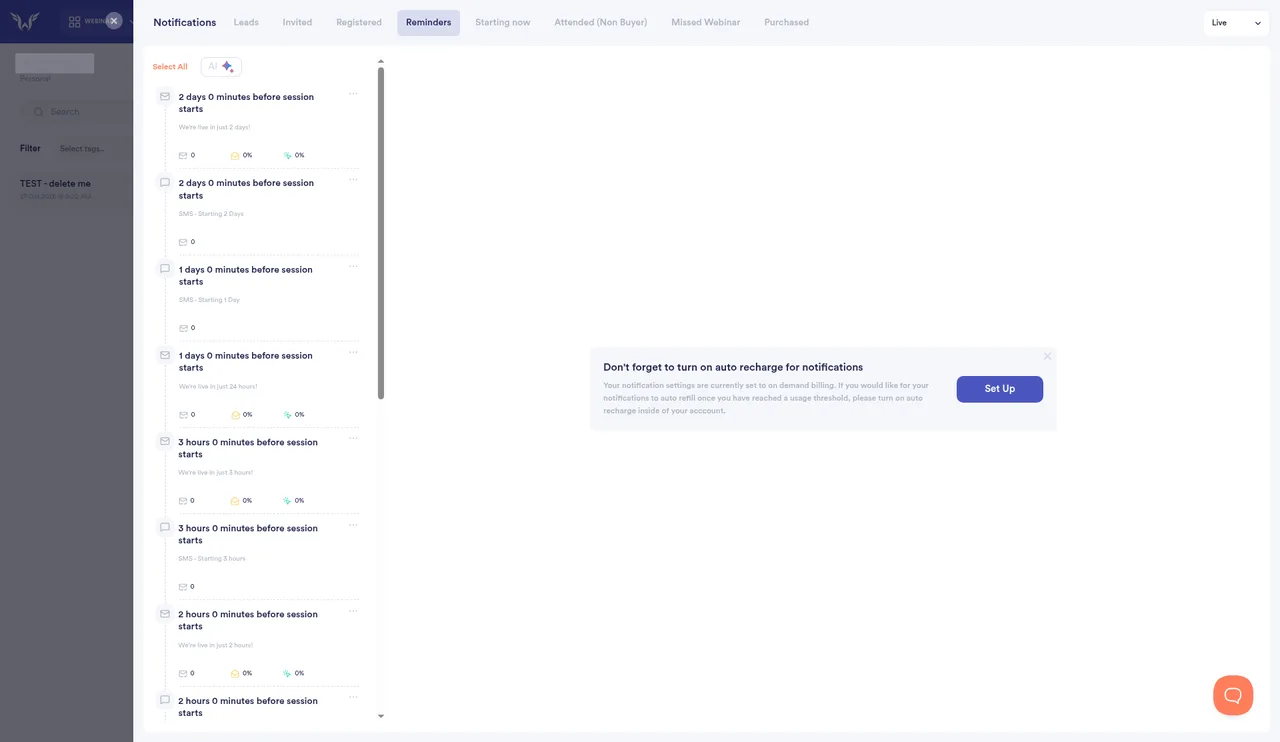
- Verified Oct 27, 2026: Notifications has Live / Replay / Encore sets, each with tabs Leads, Invited, Registered, Reminders, Starting now, Attended (Non Buyer), Missed Webinar, Purchased. Each tab lets you "Add Email", "Add SMS" or "Add Push", plus an AI button.
- Registered defaults: push + SMS + email at 0 minutes after registration, and a "One more thing.." email at 2 minutes.
- Reminders defaults: email + SMS at 2 days, 1 day, 3 hours, 2 hours, 1 hour, 15 minutes and 5 minutes before the session, plus an SMS at 1 minute (its default text says "5 minutes", so edit it).
- Credits are metered: a banner on the Notifications screen says notifications are billed on demand and nudges you to turn on auto recharge ("Don't forget to turn on auto recharge for notifications"). Watch your credit balance before turning on lots of SMS.
- SMS opt-in (verified Oct 30, 2026): we found no SMS opt-in control in Notifications or in Settings > SMTP & SMS. That panel only holds sender details: Attach Calendar Link To Reg Email (on), From Name (default "Webby"), Company Name, Address, Support Email, Reply Email and SMS From Name. There's no own-SMTP server setup. Because the default form has no phone field, you add a phone Input and an unticked consent Checkbox to the widget yourself before sending SMS reminders.
- Extra credits: the price is not published on their site or in our trial billing screen without clicking Buy More (we didn't), so we are not quoting an overage number.
- Oct 30 default sequences, for reference: Leads (abandoned registration) at 5 min, 23 h, 2 d, 3 d and more, each with "% recovered"; Starting now SMS + email at 1 min and email at 2 min; Attended (Non Buyer) replay messages from 1 h to 2 d ("replay page will be removed soon"); Missed Webinar at 1 h, Day 3 and "3 days before closeout"; Purchased empty ( Registered Purchased).
- Note: the doc mentions a "Standard plan" with lower limits, but the current pricing page lists only Pro and FuelSuite Pro. Don't mention a Standard plan unless checkout shows one.
Step 9: Set up sales tracking
Add WebinarFuel's tracking code to your post-purchase thank-you page so sales show up in your dashboard.
- Verified Oct 27, 2026: the webinar's Settings panel has Sales tracking and Third party tracking entries (also Branding, SMTP & SMS, Quiet Hours, Registration & Thank You URL, Webby App Settings, Webinar Chat Notifications, Zapier, Domain).
- Verified Oct 30, 2026: Sales tracking offers Postback URL (the default), ClickFunnels, SamCart and "JS Tracking (Will Sunset by 2026)". The Postback URL is a goal-tracking link on WebinarFuel's embed domain with your webinar's ID and placeholders for the offer ID, order ID, amount, contact ID and email, plus Offer, Level and Amount fields. ClickFunnels and SamCart showed "not available in your plan" on our trial.
- Stripe and ThriveCart aren't named in WebinarFuel's sales-tracking panel. ThriveCart's docs confirm webhooks/query-string can pass order_id and order total/amount (support.thrivecart.com webhook + query-string help). Stripe Checkout/Payment Links can pass session/payment data via webhooks or success URL params (docs.stripe.com). We have not wired either into WebinarFuel's Postback URL ourselves — map fields carefully.
Step 10: Choose your Webby App settings
WebinarFuel's final setup step controls how attendees view your webinars (its "Webby App" preferences).
- "Webby App Settings" is in the webinar's Settings panel.
- Verified Oct 30, 2026: Webby App Settings choose whether viewers watch in the browser or in WebinarFuel's Webby app, set separately for Mobile Live (default App), Mobile Replay (Browser), Desktop Live (Browser / App / Split Test, default App) and Desktop Replay (Browser). The one to think about: live sessions default to the app, so decide whether you want attendees asked to use an app. Split Test (Desktop Live only) compares Browser against App. Related doc: How to change Webby App preferences
Step 11: Test it end to end
Register yourself with a phone number and a test email, then check the confirmation, every reminder, the room, the offer button, and the replay.
- Verified Oct 30, 2026 (stopwatch): from opening Create Webinar to having a video uploaded (a 3-second test mp4), an Every Day 8:00 PM session and the default widget took about 2 minutes. That's a bare-bones setup: no widget design, reminder edits, CTAs, integrations or sales tracking, and a tiny video file. A real build with your own recording and copy will take longer; we didn't time one.
- We didn't run a test registration: the trial webinars were unpublished, and nothing was registered or sent. Reader checklist before you go live: confirmation email/SMS, reminders, room load, offer CTA, and replay. We did not run a registration in our unpublished trial webinars.
Common problems
- Viewers can't see the chat: see WebinarFuel's doc My viewers can't see the chat.
- Wrong Vimeo link: see Grabbing the proper Vimeo link.
- "Valid Vimeo Pro URL" error: Integrated Video rejects YouTube and plain .mp4 links (our test, Oct 27, 2026). Upload the file instead, or use a Vimeo Pro link.
Is WebinarFuel the right tool?
Short pointer to the review, pricing breakdown and alternatives.
Affiliate link: we may earn a commission at no extra cost to you. Disclosure